


This articles serves as a guide for unit testing Vue components. We'll first look at why unit testing is important for creating maintainable software and afterwards we will go over what we should test.
Why Unit Test?
Software projects with high test coverage are never perfect, but it's a good initial indicator of the quality of the software. Additionally, testable code is generally a sign of a good software architecture, which is why experienced developers take testing into account throughout the entire development lifecycle.
Unit tests test the functionality of an individual unit of code isolated from its dependencies. They are the first line of defence against errors and inconsistencies in your codebase. Unit testing is a fundamental part of the Test-Driven Development (TDD) process and can improve the maintainability of your code.
Maintainability refers to making bug fixes or enhancements to your code or for another developer needing to update your code at some point in the future.
Unit testing should be combined with a Continuous Integration (CI) process to ensure that your unit tests are constantly executing, ideally on each commit to your repository. A solid suite of unit tests can be critical to catching defects quickly and early in the development process before your end users come across them in production.
What to test?
So we know that testing is valuable, but what exactly should we be testing in our applications? It's easy to go overboard and test things you don't have to, which unnecessarily slows down development time. So what do we test in a Vue.js app? The answer is actually quite simple: components. Since a Vue app is merely a puzzle of components, we need to be testing their individual behaviour to make sure they're working correctly.
The Component Contract
By the component contract we're referring to the agreement between a component and the rest of the application.
For example, imagine a component that takes in a x and y props and positions a circle at the given prop values, which it renders to the DOM. The component contract says: I will accept two props and use them to position a circle. Within this contract is the concept of inputs and outputs. The component agrees to receive the x and y props as inputs and to deliver a circle at the given position props as the output. As such, we can start to pick apart what we should be testing by thinking through the component contract, and identifying the inputs and outputs.
At a high level, common inputs and outputs are as follows:
Inputs
- - Component Data
- - Component Props
- - User Interaction ( Ex: button click )
- - Vuex Store
- - Route Params
Outputs
- - What is rendered to the DOM
- - External function calls
- - Events emitted by the component
- - Route Changes
- - Updates to the Vuex or Pinia Store
By focusing on these specifically, you avoid focusing on the internal business logic. In other words, we shouldn't be worrying about how every single line of code works. It may seem counter intuitive, but the goal of unit testing is purely to ensure your components are producing the expected results. We aren't concerned about how it arrived at that result. We may even change the way we're logically arriving at that result later on, so we don't want our tests to be unnecessarily prescriptive about how that ought to be achieved. It's up to your team to figure out the most efficient path to that result. That's not the job of testing. As far as a unit test is concerned, if it works, it works.
Now that we know what we should be testing, let's look at a couple basic examples and identify what we might test in each.
In this example, we have a component that will display a dashboard button if the isAdmin property is true.
To get clear on what part of this component we should test, our first step is to identify the component's inputs and outputs.
Inputs
Data (isAdmin)
This data property determines if the button is visible or not, so this is an input that we should be testing
Outputs
Rendered Output (button)
Based on the inputs (isAdmin), is our button being displayed in the DOM when it should be?
With more complex components, there will be more aspects of it to test, but the same general approach applies.
When to test rendered component output:
Coupling is the interdependence between modules of code. Tightly coupled code makes it difficult to refactor, because you can break tens of tests in a file when you decide to change the implementation.
To avoid this remember the following principles when testing component output:
- - test only output dynamically generated
- - test only output that is part of the component contract
If you follow these rules, you will never write tests for presentational elements and static CSS classes. You should add presentational style without writing unit tests.
Testing rendered component output examples
- testing rendered text
- test DOM attributes
- test using find/findAll
- test props
- test element classes
- test style
What NOT to test
Understanding what doesn't need to be tested is an important part of the testing story that many developers don't think about, and in turn it costs them a lot of time that could be spent elsewhere.
Don't test implementation details
When unit-testing we don't need to fuss over how certain things work, just that they do work. We don’t need to set up a test that calls the function that generates our random number, making sure it behaves in a certain way. We don't care about the internals here. We just care that the component produced the output we are expecting. This way, we can always come back later and replace the implementation logic (with a third-party library for generating random numbers, for example).
Don't test the framework Itself
Developers often try to test too much, including the inner workings of the framework itself. But the framework authors already have tests set up to do that. For example, if we set up some prop validation for our min and max props, specifying they need to be a Number , we can trust that Vue will throw an error if we try passing in a string. We don’t need to waste our time doing Evan You's job and testing the Vue.js framework. This includes not doing needless tests on Vue Router and Vuex, too.
Don't test third party libraries
If the third-party libraries you are using are of high quality, they will already have their own tests. We don’t need to test their internals. For example, we don’t need to test that Axios works how it should. The Axios team does that for us. These are the types of things that will bog us down if we worry about them unnecessarily. If you don’t feel you can trust the library you’re using to have been well tested, perhaps that’s a sign you might want to avoid using it to begin with.
Test-driven development
TDD a workflow where you write a failing test before you write the source code. It forces you to think about component design first.
Sanity test
Always write a sanity test so you know your test system is set up correctly.
Describe Blocks
After the import statements, there is a describe block which defines a unit test suite.
Within a unit test file, there can be multiple describe blocks that define different unit test suites. Similarly, each describe block can contain multiple unit tests, where each unit test is defined by an it block.
I think about this distinction as:
- - describe block - unit test suite
- - it block - individual unit test function
What's really nice about unit testing in Vue is that there are a number of built-in encouragements for adding comments. For example, the describe syntax requires that the first argument be the name of the test suite. When testing Vue components, it's easiest to include the name of the Vue component here.
For each it block, the first argument is a description of the test function, which should be a short description of what this specific test is doing. In the example above, the it block tests that the component 'renders message when component is created.
Use describe method to group blocks of tests.
Simple Assertions
We'll keep it simple by grabbing the title and expecting it to exist. By using simple assertions, we’ll be able to isolate each step of the way.
We'll add data-testid to the h1 tag inside of the ProductsList, which contains the text for "Oranges".
Now we'll rerun the test, and since we added the selector, the tests pass! This gives us high-confidence that this assertion was doing something valuable.
Vue Test Utils API
mount method takes a component and mounts it returning a wrapper object that contains the vm and also helper methods that you can use to set props, check instance properties or perform actions on instance.
One helper method is text, which returns the textContent of the instance element.
shallowMount method mounts a component and returns a wrapper object just like mount, the difference is that shallowMount stubs all the children of a component before mounting it.
Mount's "global" Options
Vue Test Utils exposes a global object to allow users to pass things like:
- Global plugins
- Registered components
- Providers
- Directives
- Mocks
- Stubs
- and more
Writing Vue components testing strategy suggested:
- - decide the components I need
- - write unit tests and source code for each component
- - style the components
- - add snapshot tests for finished components
- - test the code manually in the browser
- - write an end-to-end test
Creating specifications from requirements
Process:
- - Agree on requirements
- - Answer questions on details to get high-level specifications and design
- - Break up design into components
High-level specifications
Requirements are descriptions of an application from a user perspective. You need to take requirements and interrogate them until you have technical specifications for how a project should work.
Component level specifications
When you have high-level specifications for an application, you then need to decide how to represent UI elements as components.
Snapshot tests
Writing tests can be a huge time sink. When Jest’s snapshot testing feature was first announced, the developers said that “… engineers frequently told us that they spend more time writing a test than the component itself.” This led to many developers saying they simply stopped writing tests entirely.
Snapshot tests can help out quite a bit in that situation because they’re typically much shorter and easier to write than traditional unit tests.
Snapshot tests are also easy to keep up to date as developers generally just need to run a single command to get the testing system to record new snapshots
Select a pattern for your Tests
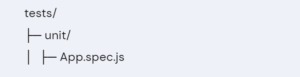
1. All tests will be in the tests/unit folder.
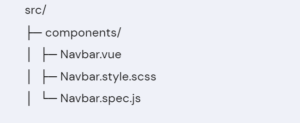
2. Tests together with the component source code
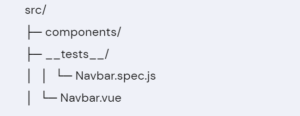
3. Tests nested in the project source code
Mocking code
Mocking code is replacing code you don't control with code you do control.
Benefits of mocking code:
- - stop side effects like HTTP calls in tests
- - you can control how a function behaves and what it returns
- - you can test that a function is called ( eg. browser native function)
If the function you are testing is running async and has a callback you need to use the done callback.
Use mocks in moderation
Mocks are great in use cases like controlling the return of a function, checking when a function is called or to stop side effects like HTTP requests. But mocking should always be a last resort because mocking increases the coupling between a test and production code and it increases the assumptions your test makes. Each extra mock in your test is a new opportunity for your test code and production code to go out of sync.
Testing Events
- example testing native DOM events
- example testing custom events
- example testing input forms
Mocha and Jest comparison
Jest is meant to work as a single and independent testing framework, which does not require any additional dependencies. Mocha, on the other hand, needs a selection of libraries integrated together to work properly. Thus, a developer has to specify which assertion, mocking, or stubbing library is going to be used in the project. Moreover, Mocha does not specify any strict requirements for setting these libraries together and is known as a more optimized tool, which results in faster execution of tests.
Mocking and stubbing is supported in Mocha by the stubbing/mocking library called "Sinon", testing coverage report is supported by "Istanbul" library wheras Jest has these tools available by default so it's a bit easier for beginners.
Which one to choose, Mocha or Jest?
Unfortunately, I won’t give you an answer to this question. It strongly depends on the type of the currently developed application.
Mocha could be the way to go for large Node.js projects thanks to its huge flexibility and variety of libraries it provides for an experienced developer.
In most cases, Jest would still be a winner as it goes along with an ecosystem composed of preconfigured features such as test runner, assertion library, and other valuable tools.
If you are looking for a shorter version of this article please check our presentation below.
0 Comments
Leave a Reply
Your email address will not be published. Required fields are marked *